Windows Kernel Programming Book Review
Apr 3, 2020 · 22 minute readTable of contents
- Introduction
- High Level Overview
- Chapter 1: Windows Internals Overview
- Chapter 2: Getting Started with Kernel Development
- Chapter 3: Kernel Programming Basics
- Chapter 4: Driver from Start to Finish
- Chapter 5: Debugging
- Chapter 6: Kernel Mechanisms
- Chapter 7: The I/O Request Packet
- Chapter 8: Process and Thread Notifications
- Chapter 9: Object and Registry Notifications
- Chapter 10: Introduction to File System Mini-Filters
- Chapter 11: Miscellaneous Topics
Introduction
Windows Kernel Programming by Pavel Yosifovich @zodiacon is an incredible and excellent technical book. My interest in kernel programming and development was ignited by the more recent and cool projects developed by the InfoSec community. The book in my opinion easily earns 9 out of 10 stars.
I already had decent experience with user mode windows C++ development so jumping into this book was a no brainer for me. The author does a fantastic job of pacing the book and completely breaks down the explanations and code examples. Even through complex scenarios, the book excels in dissecting these concepts into step-by-step digestible pieces of information for complete beginners. The book is fairly cheap on Leanpub and the content is also worth the price. If you’re thinking of diving in you can take a look at the Book Reviews on Amazon.
High Level Overview
Chapter 1: Windows Internals Overview
This chapter provides an overview of Windows Internals concepts that will be used throughout the book. These concepts are Virtual Memory, Threads, Processes. Services, Handles, Objects, System Services and General System Architecture. For a more better and through understanding of these concepts, the author has a Windows Internals Course Series on PluralSight.
Chapter 2: Getting Started with Kernel Development
This chapter deals with the fundamentals of getting started with kernel development and setting up a driver development environment. I also wrote a minimalistic kernel driver to prove the driver development was set and ready to go for the coming sections. My development environment matched the setup described in this chapter.
Chapter 3: Kernel Programming Basics
This section digs deeper into kernel APIs, structures and definitions. Mechanisms that invoke code in a driver are also introduced. General kernel programming guidelines were also introduced and covered.
Chapter 4: Driver from Start to Finish
Using all the knowledge from the previous chapters, this chapter walks you through writing your first functional windows driver. The driver includes a complete driver and client application. This driver demonstrated the powerful capabilities of running code in kernel mode as opposed to user mode. I won’t spoil the rest.
Chapter 5: Debugging
This section introduces kernel debugging of drivers and how to debug using the WinDbg debugger. It also covers Local and Full kernel debugging and the advantages and disadvantages of both. Setting up both debugging lab instances was particularly useful and nifty especially when dealing with my own bugs down the line.
Chapter 6: Kernel Mechanisms
Various mechanisms the Windows Kernel Provides are discussed in this chapter. Some are particularly useful when writing the drivers and others when debugging. Some of these include but are not limited to Interrupt Request Level, Deferred Procedure Calls and Thread Synchronization.
Chapter 7: The I/O Request Packet
The chapter deals with how a driver handles requests. These requests are packaged as the semi-documented I/O Request Packet (IRP) structure. Dispatch Routines, Accessing User Buffers and the I/O Stack Location are also introduced and covered. Finally, a driver to consolidate more of what was learned was put together.
Chapter 8: Process and Thread Notifications
This is a sub paragraph, formatted in heading 3 style
Chapter 9: Object and Registry Notifications
In this section, intercepting some types of operations are covered. First, object notifications, where obtaining handles to some types of objects can be intercepted are explained. Second, how to intercept Registry Operations and control Registry Access are explained and covered.
Chapter 10: Introduction to File System Mini-Filters
This chapter deals with drivers that can intercept calls destined to the file system. This was the largest chapter in the book and it took some time to get through and understand most of the concepts. I’d also add this chapter needs a few re-reads to make all the concepts sink in and solidify.
Chapter 11: Miscellaneous Topics
Finally, this section contained various driver development techniques and other miscellaneous topics that didn’t fit well with the chapters so far. My favorite by far was Filter Drivers which could monitor other types of devices (not to be confused with File System Mini-Filters).
A word on Creating Drivers of Select Exercises
I did a couple of the exercises the book offered to solidify my knowledge. I also decided to document three of them to show fellow beginners in kernel development what’s possible when dedication and commitment are applied when reading this book. By far these examples are far from perfect. Some possibly contain bugs but I did my best to put most of the code in a functional and working state. The next three sections cover these exercises. The first one is below.
Exercise 1: Create a driver that monitors process creation and allows a client application to configure executable paths that should not be allowed to execute.
Kernel drivers have the ability to be notified when certain important events occur. One of these events is Process Creation. This driver’s main purpose is to prevent executables located in configured file paths from executing. The Driver will keep a list of protected paths in a simple limited array.
Understanding Process Notifications
A driver can register for Process Creation and/or Process Exit notifications. We’ll mainly be dealing with process creation. Drivers have the power to stop a process from being created, returning an error to the caller initiating the process creation. The PsSetCreateProcessNotifyRoutineEx API is used for registering for process notifications. We can see its syntax below:
 NTSTATUS PsSetCreateProcessNotifyRoutineEx(
   PCREATE_PROCESS_NOTIFY_ROUTINE_EX NotifyRoutine,
   BOOLEAN                           Remove
 );
The first argument is the Driver’s callback Notify Routine having the following syntax:
 PCREATE_PROCESS_NOTIFY_ROUTINE_EX PcreateProcessNotifyRoutineEx;

 void PcreateProcessNotifyRoutineEx(
   PEPROCESS Process,
   HANDLE ProcessId,
   PPS_CREATE_NOTIFY_INFO CreateInfo
 )
 {...}
The second argument indicates whether the driver is registering or unregistering the callback. The API will be called with FALSE in its DriverEntry routine and call the same API with TRUE in its unload routine. The first argument is a pointer to an EPROCESS structure that represents the process that’s newly created or exited. The second argument is ProcessID which is the Process ID of the process. The third argument is CreateInfo which is a pointer to a PS_CREATE_NOTIFY_INFO structure that contains information about the new process. We can see how it’s defined:
 typedef struct _PS_CREATE_NOTIFY_INFO {
   SIZE_T              Size;
   union {
     ULONG Flags;
     struct {
       ULONG FileOpenNameAvailable : 1;
       ULONG IsSubsystemProcess : 1;
       ULONG Reserved : 30;
     };
   };
   HANDLE              ParentProcessId;
   CLIENT_ID           CreatingThreadId;
   struct _FILE_OBJECT *FileObject;
   PCUNICODE_STRING    ImageFileName;
   PCUNICODE_STRING    CommandLine;
   NTSTATUS            CreationStatus;
 } PS_CREATE_NOTIFY_INFO, *PPS_CREATE_NOTIFY_INFO;
The important fields in the structure are:
- CreatingThreadId - the process ID and thread ID of the process and thread that created the new process.
- ParentProcessId - the process ID of the parent process for the new process.
- ImageFileName - a pointer to a UNICODE_STRING string that holds the image file name of the executable, available if the flag FileOpenNameAvailable is set.
- CommandLine - A pointer to a UNICODE_STRING string that holds the command that is used to execute the process. It may be NULL if it’s not available.
- CreationStatus – is the NTSTATUS value to return for the process-creation operation. Drivers can change this value to an error code to prevent the process from being created.
Setting up Process Create Notifications
In the DriverEntry we register for process notifications and this routine is called OnProcessNotify and can be found on the ZeroDawn.cpp file:
 status = PsSetCreateProcessNotifyRoutineEx(OnProcessNotify, FALSE);
 if (!NT_SUCCESS(status)) {
 	KdPrint((DRIVER_PREFIX "failed to register process callback (0x%08X)\n", status));
	break;
 }
Then we checkout the callback routine:
void OnProcessNotify(PEPROCESS Process, HANDLE ProcessId, PPS_CREATE_NOTIFY_INFO CreateInfo) {

  UNREFERENCED_PARAMETER(Process);
  UNREFERENCED_PARAMETER(ProcessId);

  if (CreateInfo) {

    if (CreateInfo->FileOpenNameAvailable && CreateInfo->ImageFileName)
    {
      KdPrint(("ImageFilePath: %wZ\n", CreateInfo->ImageFileName));
      AutoLock locker(DirNamesLock);
      if (FindDirectory(CreateInfo->ImageFileName, true) >= 0) {

        KdPrint(("File not allowed to Execute: %ws\n", CreateInfo->ImageFileName->Buffer));
	CreateInfo->CreationStatus = STATUS_ACCESS_DENIED;

      }
      else {
	KdPrint(("File Allowed to Execute: %ws\n", CreateInfo->ImageFileName->Buffer));
      }
    }
  }

  // ProcessExit
  else {

  }

}
The callback first checks if CreateInfo exists. It doesn’t exist for processes that are exiting. If it does exist, we then check for the ImageFileName using the FileOpenNameAvailable member. If the ImageFileName exists we can then acquire a mutex so our operations are protected. A helper function called FindDirectory is used to check if the ImageFileName is protected. If it’s part of the directory names protected, we block its creation by returning STATUS_ACCESS_DENIED via the CreationStatus. If it’s not part of the protected list, it’s allowed to execute.
User Mode Client
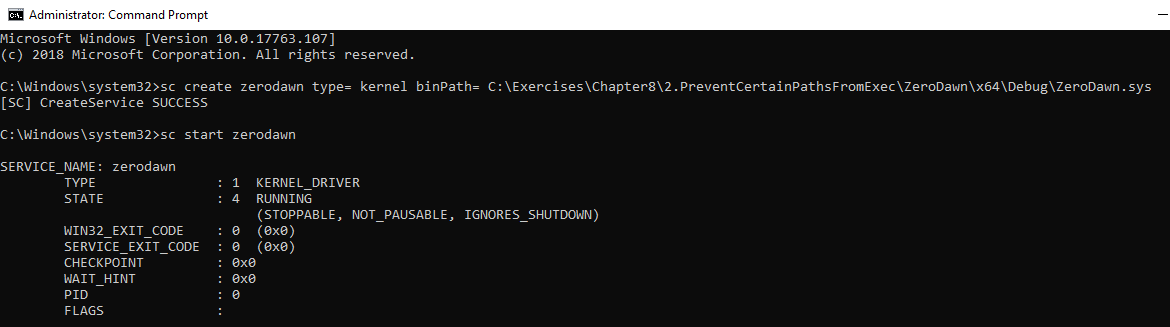
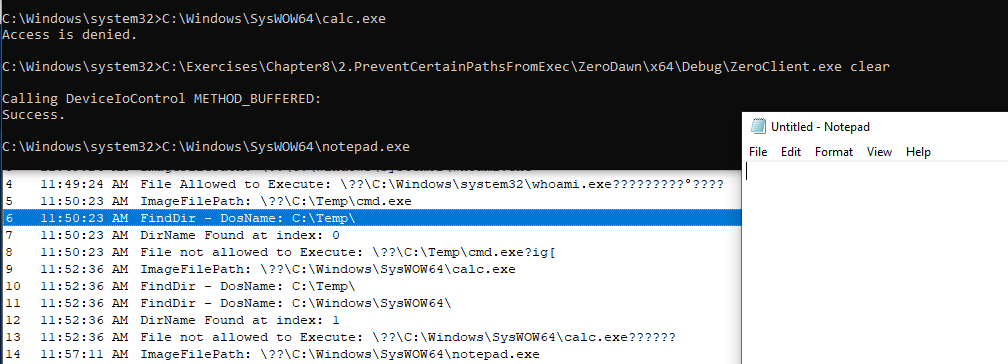
To configure which executable paths which are blocked or unblocked, a user mode client that communicates with the EDR driver was created. It allows you to add executable paths to a simple limited array, where these paths are kept in the kernel. For every process created, the driver gets an in-line notification. The driver examines its array and if the executable path is part of the protected list in the array it’s blocked. It’s not a perfect, feel free to use the code and improve upon it. By default, up to 4 executable paths are protected. We can install the driver and then start it:
sc create zerodawn type= kernel binPath= C:\Code\ZeroDawn.sys

sc start zerodawn
We can see a sample run of the client and the options it offers:

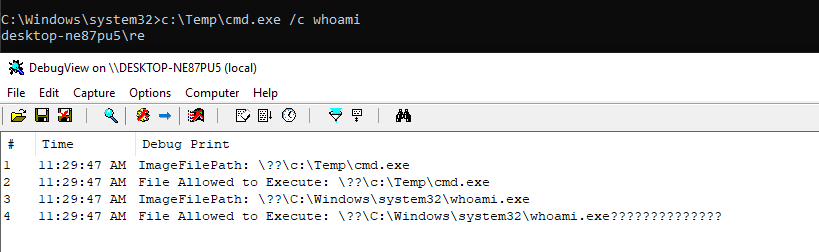
Initially, we can see a copied cmd.exe can execute a command from a folder C:\Temp:
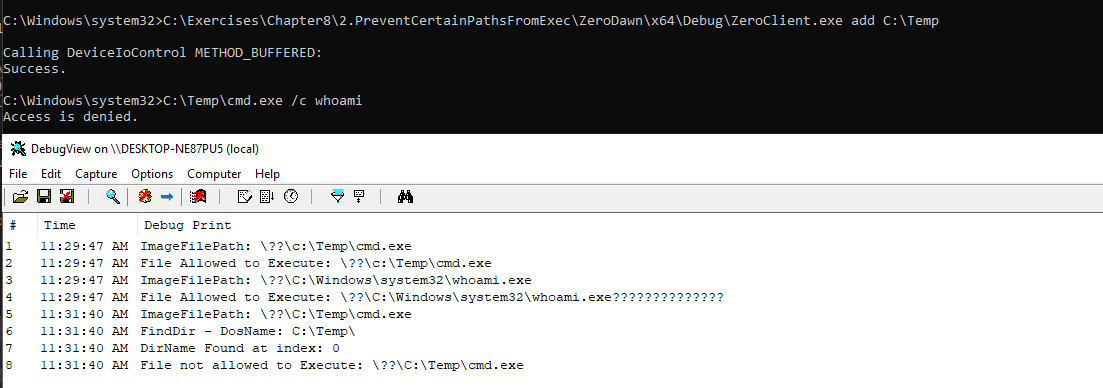
And then we add C:\Temp path to prevent execution from it. When we try to execute the cmd again from this folder, we get a sweet Access is Denied:
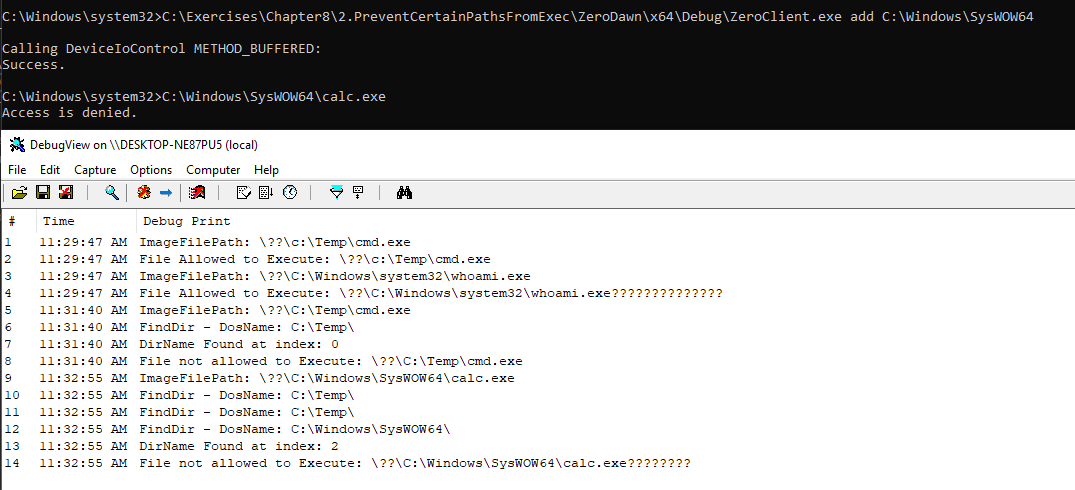
Similarly, we can add another folder. Execution of an executable is blocked from that folder too as shown below:
A file path can be removed or we can clear all paths. Clearing all paths is demonstrated below leading to both protected folders being unprotected:
Summary
This was an awesome exercise to learn more about Process Notifications and how to save data from user mode clients using simple limited arrays. There are far more superior ways of doing this but for purposes of this proof of concept it was amazing seeing this driver in action. The driver has a flaw in that its case insenstive. A method to overcome this is described well in the book.
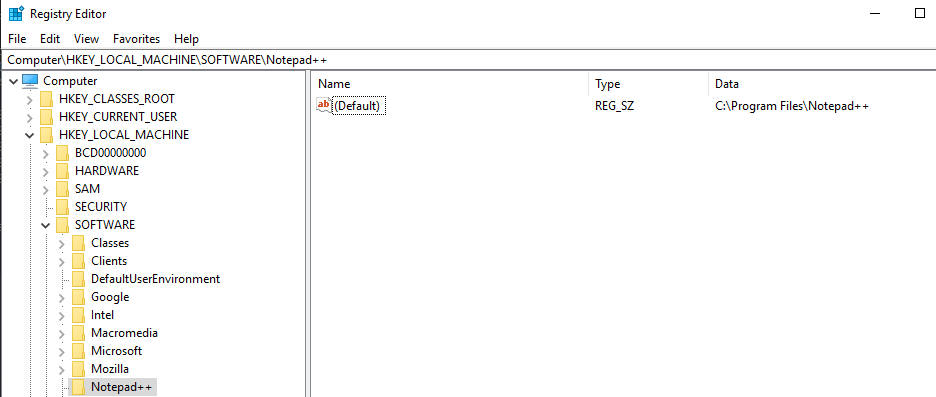
Exercise 2: Implement a driver that protects a registry key from modifications. A client can send the driver registry keys to protect or unprotect.
Kernel drivers have the ability to intercept certain operations. Object notifications are where obtaining handles to some types of objects can be intercepted e.g. process, thread and for Windows 10 – desktop. For Registry entries, the Configuration Manager (the part in the Executive that deals with the registry) can be used to register for notifications when registry keys are accessed.
Understanding Process Notifications
This exercise dealt with intercepting registry operations, specifically registry modifications. The API we used was CmRegisterCallbackEx and we can see it’s prototype:
 NTSTATUS CmRegisterCallbackEx(
   PEX_CALLBACK_FUNCTION Function,
   PCUNICODE_STRING      Altitude,
   PVOID                 Driver,
   PVOID                 Context,
   PLARGE_INTEGER        Cookie,
   PVOID                 Reserved
 );
It’s function is to register a RegistryCallback Routine. The Result of a successful registration is passed to the Cookie parameter. We can see the syntax for the RegistryCallback Routine:
 EX_CALLBACK_FUNCTION ExCallbackFunction;

 NTSTATUS ExCallbackFunction(
   PVOID CallbackContext,
   PVOID Argument1,
   PVOID Argument2
 )
 {...}
CallbackContext is the Context argument passed to CmRegisterCallbackEx. The first argument is in fact an enumeration, REG_NOTIFY_CLASS, describing the operation for which the callback is invoked, if it’s pre or post notification. The second argument is a pointer to a structure that contains information that is specific to the type of registry operation.
To unregister a callback, CmUnRegisterCallback routine is called.
 NTSTATUS CmUnRegisterCallback(
   LARGE_INTEGER Cookie
 );
Setting Up Registry Pre-Notifications
The notification we are specifically interested in, per the REG_NOTIFY_CLASS enumeration is the RegNtPreSetValueKey Notification. The driver has several options of handling the callbacks before they are carried out by the Configuration Manager. The option we’ll use is to handle the request, check if our key is being modified in some way and return STATUS_CALLBACK_BYPASS from the callback. Now that we know what we need to do, we can implement the Registry Pre-Notification. In the driver’s DriverEntry we’ll add the registry callback registration. The returned cookie representing the registration is stored in our Globals structure:
 UNICODE_STRING altitude = RTL_CONSTANT_STRING(L"7657.124");
 status = CmRegisterCallbackEx(OnRegistryNotify, &altitude, DriverObject, nullptr, &g_Globals.RegCookie, nullptr);
 if (!NT_SUCCESS(status)) {
	KdPrint((DRIVER_PREFIX "failed to set registry callback (status=%08X)\n", status));
	break;
 }
In the unload routine, we need to unregister the callback:
 void DriverUnload(_In_ PDRIVER_OBJECT DriverObject)
 {
 	// unregister callbacks
	auto status = CmUnRegisterCallback(g_Globals.RegCookie);
	if (!NT_SUCCESS(status)) {
		KdPrint(("failed on CmUnRegisterCallback (0x%08X)\n", status));
	}

 	// Snipped
  }
Our Callback only cares about modifications done to certain registry keys. To do this, we have to make sure we switch onto the operation of interest i.e. RegNtPreSetValueKey Notification:
 NTSTATUS OnRegistryNotify(PVOID, PVOID arg1, PVOID arg2) {

	auto status = STATUS_SUCCESS;

	switch ((REG_NOTIFY_CLASS)(ULONG_PTR)arg1) {
	case RegNtPreSetValueKey:
	{}
	return status;

 }
Inside the case, we cast the second argument to the pre operation data and check if the operation succeeded and if it didn’t, we break:
 auto preInfo = static_cast<PREG_SET_VALUE_KEY_INFORMATION>(arg2);
 PCUNICODE_STRING keyName = nullptr;
 if (!NT_SUCCESS(CmCallbackGetKeyObjectID(&g_Globals.RegCookie, preInfo->Object, nullptr, &keyName))) {
	break;
 }
Next, we acquire the FastMutex so that no other operations will interfere as we try to check if a registry is protected or not. The Registry Keys to protect, are received from the client and are stored in a Linked List. We enumerate over the Linked List using a for loop. We’ll extract the key name with CmCallbackGetKeyObjectIDEx. For every key name, we’ll first convert it to Unicode string and then compare it using RtlInitUnicodeString. If the compared Unicode key names are equal to each other, we block the modification and return STATUS_CALLBACK_BYPASS. For the unmatched keys, return STATUS_SUCCESS:
 for (auto i = 0; i < g_Globals.ItemCount; i++)
 {
 	auto entry = RemoveHeadList(&g_Globals.ItemsHead);
	auto info = CONTAINING_RECORD(entry, FullItem<RegKeyProtectInfo*>, Entry);
	auto kName = (WCHAR*)&info->Data;

	UNICODE_STRING tbcName;
	RtlInitUnicodeString(&tbcName, kName);

	if (RtlCompareUnicodeString(keyName, &tbcName, TRUE) == 0)
	{
		KdPrint(("Found a Matching Protected key. Blocking Any Modification Attempts."));
		InsertTailList(&g_Globals.ItemsHead, entry);
		status = STATUS_CALLBACK_BYPASS;
		break;
	}
	InsertTailList(&g_Globals.ItemsHead, entry);

 }
}
}

return status;
}
User Mode Client
To configure which registry keys which are protected or unprotected a user mode client that communicates with the driver was created like in the previous exercise. It allows you to add registry keys to a doubly-linked list. For every registry key, the driver gets an in-line notification. The driver examines this doubly linked list and if the executable registry key to be modified is part of this list, the modification is blocked. Otherwise, the other unprotected registry key operations are not interfered with. It’s also not a perfect like the previous example. By default, up to 10 registry keys are protected.
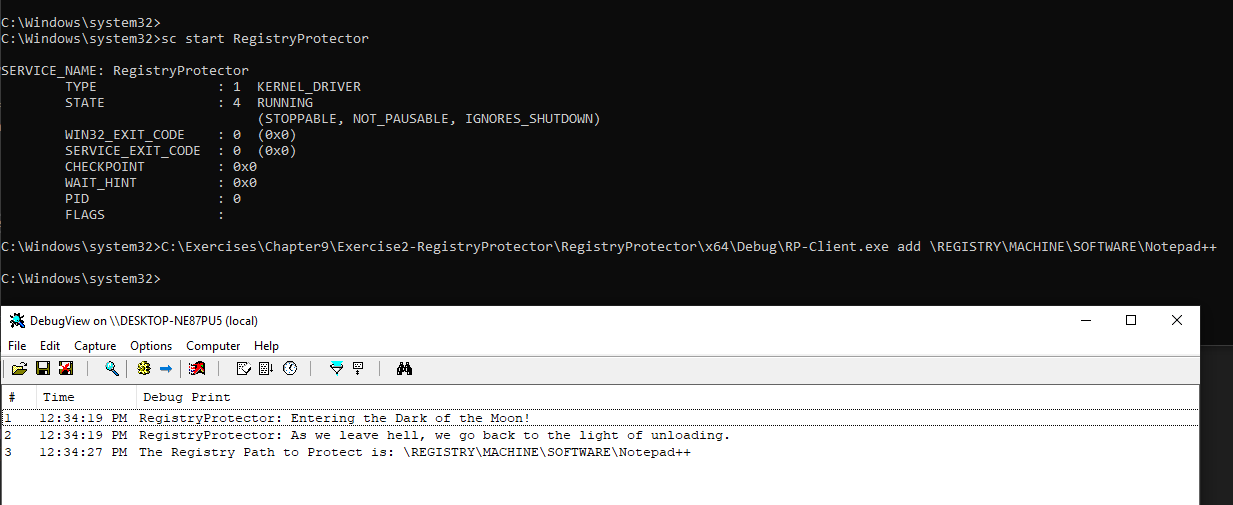
We can install and start the driver like in the previous exercise:
sc create RegistryProtector type= kernel binPath= C:\Code\RegistryProtector.sys

sc start RegistryProtector

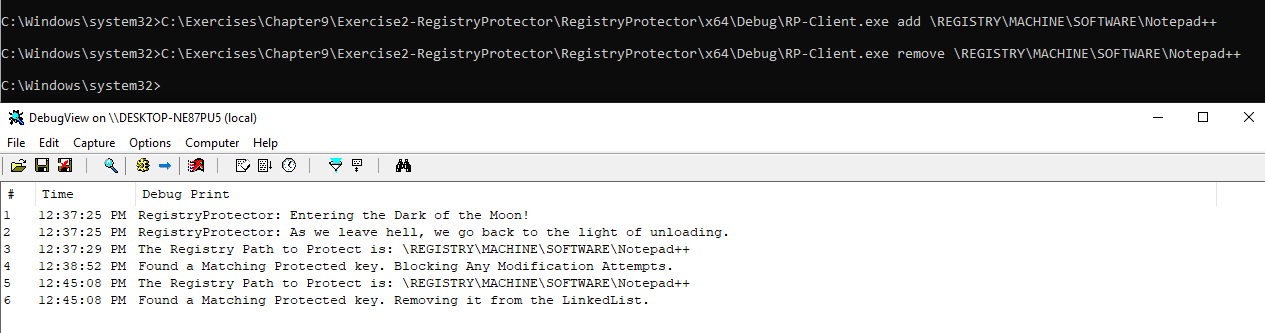
The client called RP-Client application adds, removes or clears registry keys to protect by issuing correct DeviceIoControl calls. We can add a registry key to protect:
We try modifying the value of the registry key using regedit by adding a + to it:
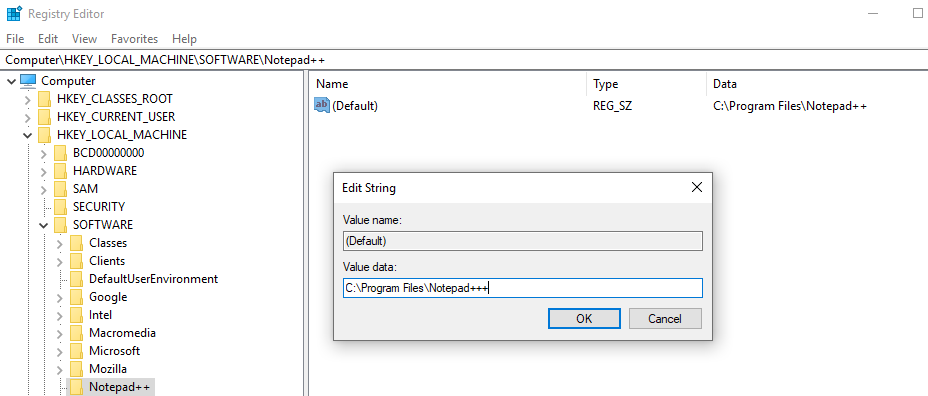
We press OK and the operation is intercepted and blocked, even though in the GUI it looks like it worked:
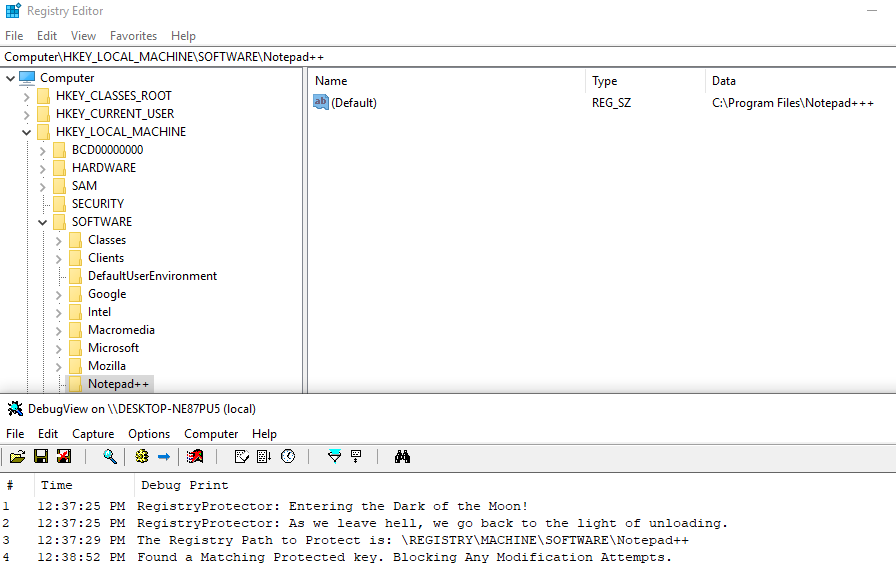
After a refresh, we see the value of the registry key hasn’t changed one bit:
We can remove the protected registry key as shown:
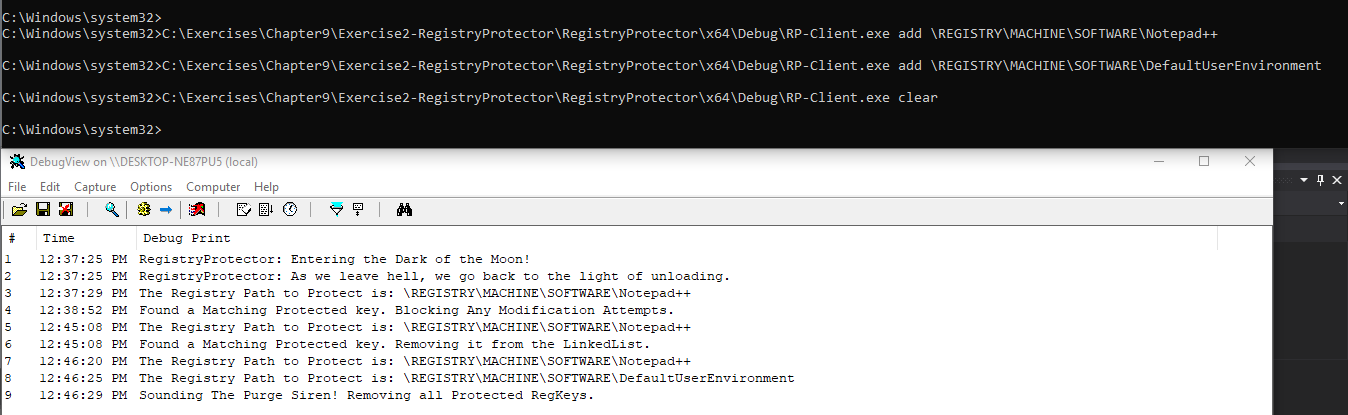
We can add multiple registry keys and remove them using the clear function:
Summary
This was a really nice challenge to learn more about Registry Pre-Notifications and how to incorporate Linked Lists into my code and how they handle data and overall workflow when managing such data from user mode clients.
Exercise 3: Write a file system mini-filter that captures delete operations from cmd.exe and instead of deleting them, moves the files to the RecycleBin.
File system filtering is the mechanism by which drivers can intercept calls destined to the file system. This is useful for software such as AVs and EDRs. In this driver, I extended it a bit and decided to add options to add more than one blacklisted executable name from which to intercept delete operations from other than just cmd.exe. The executable names are stored in a simple limited array. The maximum it can hold is around 32 names.
Understanding Processing I/O Operations and Pre-Operation Callbacks
The main function of a file system mini-filter is processing I/O operations by implementing pre and/or post callbacks for the operations of interest. Pre operations allow a mini-filter to reject an operation completely. In this case Pre-Operation Callbacks are used to capture delete operations from cmd.exe and move the deleted files instead to the Recycle Bin.
All Pre-Operation callbacks have the same prototype:
 PFLT_PRE_OPERATION_CALLBACK PfltPreOperationCallback;

 FLT_PREOP_CALLBACK_STATUS PfltPreOperationCallback(
   PFLT_CALLBACK_DATA Data,
   PCFLT_RELATED_OBJECTS FltObjects,
   PVOID *CompletionContext
 )
{...}
The first argument is Data is a pointer to the callback data (FLT_CALLBACK_DATA) structure for the I/O operation. It provides all information related to the I/O itself. The FLT_CALLBACK_DATA structure is defined as shown:
 typedef struct _FLT_CALLBACK_DATA {
   FLT_CALLBACK_DATA_FLAGS     Flags;
   PETHREAD                    Thread;
   PFLT_IO_PARAMETER_BLOCK     Iopb;
   IO_STATUS_BLOCK             IoStatus;
   struct _FLT_TAG_DATA_BUFFER *TagData;
   union {
     struct {
       LIST_ENTRY QueueLinks;
       PVOID      QueueContext[2];
     };
     PVOID FilterContext[4];
   };
   KPROCESSOR_MODE             RequestorMode;
 } FLT_CALLBACK_DATA, *PFLT_CALLBACK_DATA;
The members of note are:
- Flags may contain zero or a combination of flags.
- Thread is an opaque pointer to the thread requesting this operation.
- IoStatus is an IO_STATUS_BLOCK structure that contains status and information for the I/O operation. A mini-filter can modify the contents of this structure only in a pre-operation callback (PFLT_PRE_OPERATION_CALLBACK) routine from which it is about to return FLT_PREOP_COMPLETE.
- RequestorMode indicates the execution mode of the process that initiated the I/O operation, either KernelMode or UserMode.
- Iopb is a pointer to an FLT_IO_PARAMETER_BLOCK structure that contains the detailed parameters for the I/O operation. It’s defined as shown:
 typedef struct _FLT_IO_PARAMETER_BLOCK {
   ULONG          IrpFlags;
   UCHAR          MajorFunction;
   UCHAR          MinorFunction;
   UCHAR          OperationFlags;
   UCHAR          Reserved;
   PFILE_OBJECT   TargetFileObject;
   PFLT_INSTANCE  TargetInstance;
   FLT_PARAMETERS Parameters;
 } FLT_IO_PARAMETER_BLOCK, *PFLT_IO_PARAMETER_BLOCK;
The notable members are: + TargetFileObject is the file object that is the target of this I/O operation.
- Parameters is a FLT_PARAMETERS structure that contains the parameters for the I/O operation that are specified by the MajorFunction and MinorFunction members.
The second argument to the pre-callback is another structure of type FLT_RELATED_OBJECTS. It’s defined as shown:
 typedef struct _FLT_RELATED_OBJECTS {
   USHORT        Size;
   USHORT        TransactionContext;
   PFLT_FILTER   Filter;
   PFLT_VOLUME   Volume;
   PFLT_INSTANCE Instance;
   PFILE_OBJECT  FileObject;
   PKTRANSACTION Transaction;
 } FLT_RELATED_OBJECTS, *PFLT_RELATED_OBJECTS;
The FileObject field is the same one accessed through the I/O parameter block’s TargetFileObject Field. The third argument to the pre-callback is a context value that can be set by the driver.
Implementing Overall Filter Registration
First, we need to register the operations callback. Our mini-filter driver must indicate which operations it’s interested in. This is done at registration time with an array of FLT_OPERATION_REGISTRATION structures. We can see the definition:
 typedef struct _FLT_OPERATION_REGISTRATION {
   UCHAR                            MajorFunction;
   FLT_OPERATION_REGISTRATION_FLAGS Flags;
   PFLT_PRE_OPERATION_CALLBACK      PreOperation;
   PFLT_POST_OPERATION_CALLBACK     PostOperation;
   PVOID                            Reserved1;
 } FLT_OPERATION_REGISTRATION, *PFLT_OPERATION_REGISTRATION;
We are interested in certain pre operations involving delete. Here’s the initialized array of FLT_OPERATION_REGISTRATION structures will be called Callbacks:
 CONST FLT_OPERATION_REGISTRATION Callbacks[] = {
	{ IRP_MJ_CREATE, 0, DelProtectPreCreate, nullptr },
	{ IRP_MJ_SET_INFORMATION, 0, DelProtectPreSetInformation, nullptr },
	{ IRP_MJ_OPERATION_END }
 };
Now that we’ve setup the array, the registration for the driver is shown below without any contexts:
 CONST FLT_REGISTRATION FilterRegistration = {

	sizeof(FLT_REGISTRATION),
	FLT_REGISTRATION_VERSION,
	0,                       //  Flags
	nullptr,                 //  Context
	Callbacks,               //  Operation callbacks
	DelProtectUnload,                   //  MiniFilterUnload
	DelProtectInstanceSetup,            //  InstanceSetup
	DelProtectInstanceQueryTeardown,    //  InstanceQueryTeardown
	DelProtectInstanceTeardownStart,    //  InstanceTeardownStart
	DelProtectInstanceTeardownComplete, //  InstanceTeardownComplete

 };
With all that finished, all we need to do is to start filtering in the driver’s DriverEntry. A mini-filter driver must register itself as a mini-filter with the filter manager, specifying various settings, such as what operations it wishes to intercept. Having done the necessary initializations above, we can call FltRegisterFilter to register. Here’s its:
 NTSTATUS FLTAPI FltRegisterFilter(
   PDRIVER_OBJECT         Driver,
   const FLT_REGISTRATION *Registration,
   PFLT_FILTER            *RetFilter
 );
If successful, the driver can do further initializations as needed and finally call FltStartFiltering to actually start filtering operations. We can see the registration for our driver’s implementation:
 status = FltRegisterFilter(DriverObject, &FilterRegistration, &gFilterHandle);

 FLT_ASSERT(NT_SUCCESS(status));
 if (!NT_SUCCESS(status))
	break;
Then start filtering:
status = FltStartFiltering(gFilterHandle);Handling Pre-Operation Callbacks
For this section, I’ll only cover handling PreSetInformation. All the callbacks have the same prototype:
 FLT_PREOP_CALLBACK_STATUS DelProtectPreSetInformation(PFLT_CALLBACK_DATA Data, PCFLT_RELATED_OBJECTS FltObjects, PVOID* CompletionContext) {
	UNREFERENCED_PARAMETER(FltObjects);
	UNREFERENCED_PARAMETER(CompletionContext);
	UNREFERENCED_PARAMETER(FltObjects);
First, we’ll check if the operation is originating from kernel mode, and if so, just let it continue uninterrupted:
 if (Data->RequestorMode == KernelMode)
     return FLT_PREOP_SUCCESS_NO_CALLBACK;
Next, we need to check if this is a delete operation. This is done using the parameter’s union by accessing the correct structures. The FileDispositionInformation enumeration value indicates a delete operation. The FileDispositionInformationEx is similar and undocumented, but is used internally by the user mode DeleteFile function, so we check for both:
 auto& params = Data->Iopb->Parameters.SetFileInformation;

 if (params.FileInformationClass != FileDispositionInformation && params.FileInformationClass != FileDispositionInformationEx) {
	// not a delete operation
	return FLT_PREOP_SUCCESS_NO_CALLBACK;
 }
If it is a delete operation, we check the information buffer which is of type FILE_DISPOSITION_INFORMATION for delete operations and checking the Boolean stored there:
 auto info = (FILE_DISPOSITION_INFORMATION*)params.InfoBuffer;
 if (!info->DeleteFile)
      return FLT_PREOP_SUCCESS_NO_CALLBACK;
Finally, we are in a delete operation. We need to figure out from which process where the delete operation originated from i.e. check if it’s from a blacklisted executable name. We do this by combining ObOpenObjectByPointer to get a handle to the process and then call ZwQueryInformationProcess to query for the process’ image file name, and see if it’s from a blacklisted executable name:
 auto process = PsGetThreadProcess(Data->Thread);
 NT_ASSERT(process);

 HANDLE hProcess;
 auto status = ObOpenObjectByPointer(process, OBJ_KERNEL_HANDLE, nullptr, 0, nullptr, KernelMode, &hProcess);
 if (!NT_SUCCESS(status))
 	return FLT_PREOP_SUCCESS_NO_CALLBACK;

 auto returnStatus = FLT_PREOP_SUCCESS_NO_CALLBACK;

 auto size = 512;
 auto processName = (UNICODE_STRING*)ExAllocatePool(PagedPool, size);
 if (processName) {
 	RtlZeroMemory(processName, size);	// ensure string will be NULL-terminated
	status = ZwQueryInformationProcess(hProcess, ProcessImageFileName, processName, size - sizeof(WCHAR), nullptr);

	if (NT_SUCCESS(status) && processName->Length > 0) {
		KdPrint(("Delete operation from %wZ\n"));
		auto exeName = ::wcsrchr(processName->Buffer, L'\\');
Next we call FltGetFileNameInformation API that can return the correct file name information for the file being deleted with the assistance of FltParseFileNameInformation:
status = FltGetFileNameInformation(Data, FLT_FILE_NAME_QUERY_DEFAULT | FLT_FILE_NAME_NORMALIZED, &nameInfo);
if (!NT_SUCCESS(status))
	return FLT_PREOP_COMPLETE;

status = FltParseFileNameInformation(nameInfo);
if (!NT_SUCCESS(status))
	return FLT_PREOP_COMPLETE;
Next, we’ll need to get the DOS file name. First, we get the target file’s dos name. We’ll be using the IoQueryFileDosDeviceName which retrieves the MS-DOS device name. This device name is filled in on successful return from the IoQueryFileDosDeviceName call in the newly allocated OBJECT_NAME_INFORMATION structure pointed to by ObjectNameInformation:
POBJECT_NAME_INFORMATION ObjectNameInformation = nullptr;
IoQueryFileDosDeviceName(Data->Iopb->TargetFileObject, &ObjectNameInformation);
KdPrint(("Dos Letter Name: %wZ\n", ObjectNameInformation->Name));
Then we allocate space the name for the target file name which we’ll then “build” into a proper DOS file name:
auto dosName = ObjectNameInformation->Name;
auto NameLength = (USHORT)dosName.MaximumLength + Data->Iopb->TargetFileObject->FileName.MaximumLength + 2;
auto NameBuffer = ExAllocatePoolWithTag(PagedPool, NameLength, DRIVER_TAG);
if (NameBuffer == nullptr) {
	KdPrint(("Failed to allocate memory\n"));
	return FLT_PREOP_COMPLETE;
}

UNICODE_STRING NameString;
NameString.Length = 0;
NameString.MaximumLength = (USHORT)NameLength;
NameString.Buffer = (PWCH)NameBuffer;

UNICODE_STRING symString = RTL_CONSTANT_STRING(L"\\??\\");
RtlCopyUnicodeString(&NameString, &symString);

RtlAppendUnicodeStringToString(&NameString, &ObjectNameInformation->Name);
KdPrint(("Full Source Path Name: %wZ\n", &NameString))
Once, we get the target file name we’ll build the full destination name as it appears after the file has been transferred to the recycle bin:
// Get DestinationFile DosName
auto destNameLength = (USHORT)dosName.MaximumLength + Data->Iopb->TargetFileObject->FileName.MaximumLength + 2 + 5; //We'll add .bkup at the end of the file extension
auto destNameBuffer = ExAllocatePoolWithTag(PagedPool, destNameLength, DRIVER_TAG);
if (destNameBuffer == nullptr) {
	KdPrint(("Failed to allocate memory\n"));
	return FLT_PREOP_COMPLETE;
}

UNICODE_STRING destNameString;
destNameString.Length = 0;
destNameString.MaximumLength = (USHORT)destNameLength;
destNameString.Buffer = (PWCH)destNameBuffer;

UNICODE_STRING binString = RTL_CONSTANT_STRING(L"\\??\\C:\\$RECYCLE.BIN\\");

RtlCopyUnicodeString(&destNameString, &binString);
RtlAppendUnicodeStringToString(&destNameString, &nameInfo->FinalComponent);

KdPrint(("Full Destination Recycle Path Name: %wZ\n", &destNameString));
Once we have both file names, we can simply copy the file to the Recycle Bin.
status = ntCopyFile(NameString, destNameString);
if (!NT_SUCCESS(status))
{
	KdPrint(("ntCopyFile() failed:%x\n", status));
}
Then we cleanup and free all the memory that we used:
ExFreePool(ObjectNameInformation);
ExFreePoolWithTag(NameBuffer, DRIVER_TAG);
ExFreePoolWithTag(destNameBuffer, DRIVER_TAG);
We then let the file be deleted and complete the pre operation:
		  Data->IoStatus.Status = STATUS_SUCCESS;
		  returnStatus = FLT_PREOP_COMPLETE;
	     }
	}
	ExFreePool(processName);
    }
    ZwClose(hProcess);

    return returnStatus;
}
We can install the driver using it’s INF file and load the driver as shown:

User Mode Client #1 – Manages Protected Executable Names
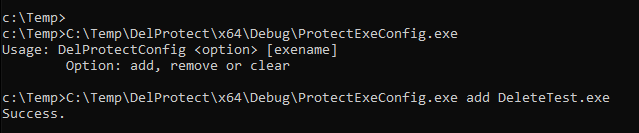
This user mode client is used to add executable names that are monitored by the driver. To achieve that it uses 3 device control codes exposed by the driver: to add, remove and clear executable names from being monitored. The name for this client is ProtectExeConfig. I’m pretty sure you can come up with a better name. The commands to control it are below:
ProtectExeConfig.exe add DeleteTest.exe
ProtectExeConfig.exe remove DeleteTest.exe
ProtectExeConfig.exe clear
We’ll see it’s use in the next section.
User Mode Client #2 – Testing the Deletion Methods
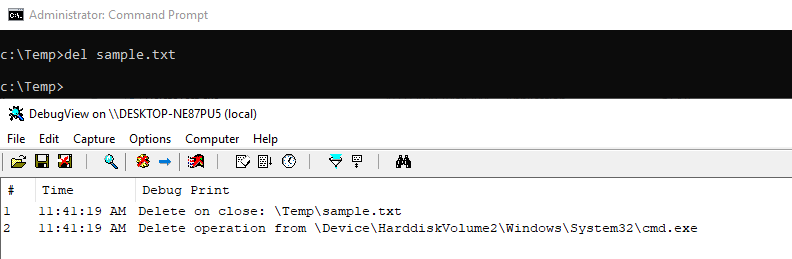
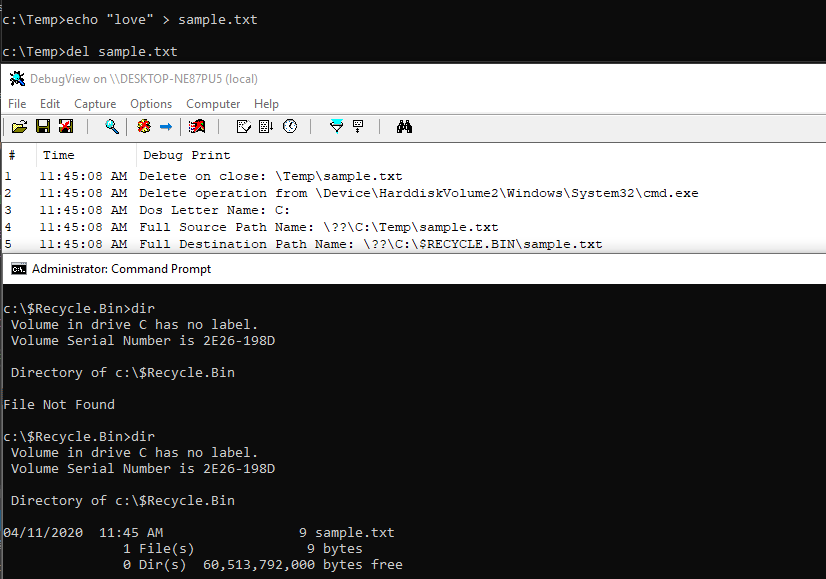
Internally, there are only two ways to delete a file - IRP_MJ_CREATE with the FILE_DELETE_ON_CLOSE flag and IRP_MJ_SET_INFORMATION with FileDispositionInformation. This client is called DeleteTest and it tests both methods. First, we can see the file being deleted from cmd.exe using the del command:
We then add cmd.exe using ProtectExeConfig to the monitored executable name list:

We can see it’s a file it backed up to the Recycle Bin when we try to delete it from cmd.exe:
Finally, we can add DeleteTest to test it if can detect deletions from other processes:
We can see the options DeleteTest offers:

And we can see testing of the Delete method via IRP_MJ_SET_INFORMATION with FileDispositionInformation:

And the second delete option via IRP_MJ_CREATE with the FILE_DELETE_ON_CLOSE flag:

Summary
This was the largest chapter and the most time-consuming chapter to complete and grasp. However, it was well worth it. Extending this driver beyond the exercise handed out by the book an awesome and intense learning experience.
Conclusion
The sections discussing the exercises are written mostly for people who’ve gone through the entire book and got stuck while doing the exercises or those who just want to compare their solutions to alternative ones. This post is just a teaser of what’s possible while operating in kernel mode. I seriously couldn’t recommend this book enough.
Special Thanks
Special thanks to
References
Coming soon